


TIME REQUIRED: 1 Hour | DIFFICULTY: Average
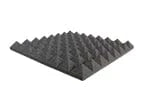
Most of the YouTubers that you can watch these days have acoustic foam setup in their studios. Acoustic foam is also a "must-have" in a studio. It will help you reduce echoes and any unnecessary noises because it will control all the reverberation that the sound can make. Using an acoustic foam is one of the effective ways to improve the audio in your room because and can tame high and mid frequencies.
TGS Anime, a gaming content creator shared with us that every once in awhile, he wants to improve some pieces of his channel. That's why he is very excited when he got his first set of Arrowzoom Wedge Acoustic Foams. In his video, he said that the only thing that he hasn't upgraded for a very long time is the audio of his studio and something that he always wanted to have is acoustic foam.
Having an acoustic foam will not just improve the design of your room but also, it is one of the best solutions to upgrade the audio in your gaming setup.
After doing these easy steps, surely you will have an enhanced audio quality to your videos just like TGS Anime did to his room.


![]()
1. Restore your Foams From its Original Shape
Restore your foams from its original shape by removing it from the vacuum-sealed packaging. let it sit in a wide-open area for about 24 - 48 hours or you may soak it in water and let it dry. Water is also a good component for foams shape restoration.

2. Peel off the Sticky Tabs and Press on the Corners of the Foams
If the foams are already back to its original shape, you may now apply the sticky tabs to every corner of the foams. Peel off the paper tab to reveal the adhesive. Make sure that the place where you are going to install the foam is free of dust and dry. Make sure to avoid any debris contamination to the adhesive side of the tape. You can also purchase an adhesive spray to any hardware near you.

3. Use Pressure to Install Foams
After applying all the sticky tabs into the acoustic foams, carefully line up the foams in the area where you want it to be placed. Use pressure against the wall while installing the foams and press it for about 30 seconds to secure it in place.

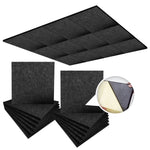
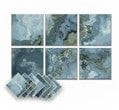
Once you follow all these quick and basic steps, you will never want to go back to the old quality of your audio every time you will stream or shoot a video to your studio. Here's a quick view of Arrowzoom Black and Blue Wedge Acoustic Foam:


USE 10% CODE: AZ-TGS